Sunday, June 30, 2013

Independence Day Sparkle Layout

In honor of the 4th of July fast approaching I wanted to share a festive layout using Doodlebug Design Inc. Stars and Stripes line.  I had this picture of my daughter from an Independence day parade a few years ago and the dress she is wearing is perfect for this paper.
 

The red piece of patterned paper is actually the back side of the sheet that comes with the package of pinwheels.  The front shows samples of the pinwheels but back side has a smaller print of this fun paper.

I added stickles to the star shaped brads to add a little sparkle around the page.


Here's a close up of the title and the paper curls.  I love making these curly strips, so easy and fun.  Check out my 4th of July Rosette Bouquet post for how to make the curls. 

Don't forget to enter for your chance to win a Project Life mini kit, click here.


Supplies Used
Cardstock - American Crafts
Patterned Paper - Doodlebug Design Inc (Stars and Stripes)
Chipboard letters - Thickers (American Crafts)
Stickles
Paper trimmer
scissors
straw or other round object
Paper piercer


Thanks for looking.
 

Friday, June 28, 2013

Project Life Giveaway!!


Happy Friday everyone!  It's time for another giveaway. 
One lucky fan will win a Project Life Holiday theme mini kit.

 
To be entered to win become a follower of the Memory Garden Designs blog and leave a comment on this post that you are a follower.  For a second entry "like" the Memory Garden Designs facebook page and leave another comment that you are now a fan. 
 
You have until 11:59 pm on Thursday, July 4th to enter.  I will randomly select a winner from all the comments.  Good luck!!! (Open to US residents only)


Wednesday, June 26, 2013

4th of July Rosette Bouquet

I was fortunate to recently have the opportunity to be a guest designer for Craft Warehouse.  I got to play with the Stars and Stripes line from Doodlebug Designs Inc.  You can check out the tutorials here and here.  I had enough goodies left over I was able to make Fourth of July rosette bouquet. 
 
 
To make the vase, trim paper an inch taller than you want the vase to be, this one is about 6" tall so you'll want a piece that is 7" x 8 1/4".  Score the 8 1/4" side at 2", 4", 6" and 8", turn and score at 1".  With the 1" score on the bottom, use scissors to trim along the 2", 4", 6" and 8" scores, just to the 1" mark.  Put a strong adhesive on the 1/4" on the side and fold your box adhering the flap to the other edge.  Now put adhesive on the bottom pieces, and close up the bottom. 
 
The rosettes are made using the Tim Holtz rosette dies.  When making a project like this I always make a variety of sizes and patterns so I have plenty to choose from.  Any extras can be used on another project.  I fussy cut the square centers from one of the patterned papers in the kit, then attach them to the centers with pop up adhesive.
 
 
I used a high temp hot glue gun to attach the rosettes to wooden BBQ skewers.  I attached them all at the same height and used pliers to cut them down as needed to the get the variation I wanted.  There is a square piece of florist foam in the bottom of the vase that the skewers are stuck into. 

 
To make the curly paper pieces trim thin strips of paper, about 1/4" wide, any length you like, you can always trim it down if it's too long.  Find something round to wrap it around,  used a round pencil, but anything round will work.

 
Once it's wrapped, let it go and you have a curly strip of paper.  Attach to the ribbon or box using a glue dot.

 
Happy almost Fourth of July!
 
Supply List
Patterned Paper
Paper Trimmer
Score Board
Tim Holtz Rosette Dies
BBQ skewers
Scissors
adhesive
embellishments


Thanks for looking! 

Monday, June 24, 2013

Ambrosia Purse Tutorial

I decided that it was time for another tutorial.  This one is my own design, Yay!  The size of the purse was determined by the length of zipper I used.  Yes, this purse has a functioning zipper on it, how cute would this be with a matching card to insert inside and give as a gift to someone special.  So follow along to learn how to make one of these for yourself.
 
 
Let's start with the zipper piece.  I have a nice stash of zippers in my craft room, a variety of new and used, many are vintage, like the one I used here.  The size of your purse will be determined by the length of zipper you use.  The zipper I used was about 7". (Note: If you don't have a zipper you can make this purse without one, if you want to have a closure, cut a small strip of patterned paper or cardstock to attach to the top back and front, on the front use repositional adhesive or Velcro).
 
 
For the size zipper I used, trim 4 strips of cardstock that are 1" x 6".  Score all pieces down the middle of the length at 1/2".
 
 
Use a strong liquid quick dry adhesive, I use Beacon's 3 n 1, and attach a piece of cardstock to both sides of the top of the zipper.  The picture above is how it will look from the bottom side at this point.  Now attach the other two pieces to the bottom side.  Set aside and let dry until it's time to attach it to the purse.
 
 
Trim two piece of cardstock that are 4" x 9".  Mark both pieces on the long side at 1" and 8". 
 
 
Line up the cardstock on your paper trimmer and trim from the 1" mark to the bottom corner.  Now line up the other side with the 8" mark and trim to the bottom corner.  Repeat for the second 4" x 9" piece. 
 
 
You should now have two pieces that look like this. 
 
 
Next trim a piece of cardstock that is 2" x 12".  With the short side horizontal on the score board, score the length at 1/2" and 1 1/2". Turn your cardstock so the long side is horizontal (like the picture above) and score at 1 1/2" and 10 1/2".
 
Once you have your score marks made, use a pencil to mark both the long side at 1 1/4", 1 3/4", 10 1/4" and 10 3/4".  Use micro tip scissors to trim from one mark to where the score lines meet.  Repeat for the other side. 
 
 
Both ends should like the picture above.
 
 
Now lets trim the pieces for the sides of the purse.  Trim 2 pieces that are 2" x 5 1/8".  With the short side horizontal score the length at 1/2", 1" and 1 1/2".  Turn so the long side is horizontal and score at 1".  Mark the both long sides at 3/4" and 1 1/4".  Use your scissors to trim from each mark into where the 1/2" score meets the 1" score and the 1 1/2" score meets the 1" score.  Fold on the center score line, with the piece folded in half, mark at 5" and trim from the corners to the 5" mark in the center. Repeat for second piece.  You should now have two pieces that look like the picture above.


Trim patterned paper for front and back of purse, use your cardstock as a template.  Adhere to cardstock pieces before assembling purse, it's easier to do while everything is still flat.
 
 
Use a strong adhesive, I like scor-tape, and cover all the edges of the 2" x 12" piece and to the edges of the 2" x 5 1/8" pieces.  Start by attaching the front and back pieces to the long strip in the middle of the 12" piece.  Then attach the side flaps to the two side pieces.  Carefully align and press together the sides to the front and back pieces.  (Note: the side flaps outside the score lines on the 12" piece have not been scored.  You can do this before assembling, or just work it slightly with your fingers to bend with the rest of the sides.)
 
 
Here's a view of what the purse should look like now from the top.  Now it's time to add the zipper.
 
 
Place adhesive on the cardstock that the zipper is attached to, a quick dry liquid is good for this part so you have a little wiggle room to align the zipper. 
 
Now that you have your purse formed you can have fun embellishing it.
 
 
I decided after I was embellishing mine, that it needed a handle.  Trim a strip of cardstock 1/4" by 12" and attach to both sides of the purse.  Attach the ribbon across the top first.
 
 
Then add the flowers, flourishes and butterflies.  Here's a close up of the flowers.  I sprayed them all lightly with a silver glimmer mist and attached either a rhinestone or pearl to the center of each one. 
 
 
The flourishes I used were actually left over pieces cut from a larger piece that was used on another project.  All the little dimensional butterflies are fussy cut from patterned paper. 
 
Hope you enjoyed the tutorial and will soon be making one of your own.
 
Supply List
Cardstock
Patterned Paper - Bo Bunny's Ambrosia line used
Paper Trimmer
Scissors
Pencil
Scor-pal or other scoring tool
Adhesive
Embellishments
 
Thanks for looking ~ Michelle

Thursday, June 20, 2013

Guest Designer on the Craft Warehouse Blog

I'm excited to be featured as a Guest Designer for Craft Warehouse today on their blog.  Check out the two 4th of July cards I made with step by step instructions.


Go to the Craft Warehouse blog for all the details on how to make these cards.
 
Thanks for looking ~ Michelle

Craft Warehouse Announces 2013 - 2014 DT


Craft Warehouse announced their 2013 - 2014 on their blog today.  I am so excited to be a returning designer this year.  You can check out all the new and returning designers here, or check out the list below.

Amanda De Jong - Scrapbooking

Arin Flynn - Paper Crafts/DIY

Denise Johnson - Mixed Media/Altered Art

Elizabeth Wiederspohn - Paper Crafts

Erica Thompson - Scrapbooking

Holly Gagnon - Paper Crafts/Card Maker

Jenifer Cowles - Seamstress

Katie Stilwater - DIY/Paper Crafts

Keri Sallee - Mixed Media

Michelle Wofford - Paper Crafts/Card Maker

Staci Wendland - Seamstress

Stephanie Paxman - DIY
 
 
Thanks for looking ~ Michelle


Tuesday, June 18, 2013

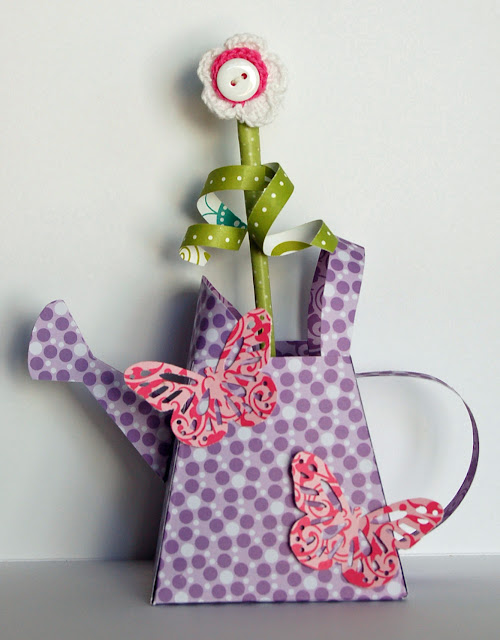
Summertime Watering Can

I have a passion for altering paper.  I love making my own embellishments and creating décor pieces from paper.  So when I came a cross this adorable watering can on Split Coast Stampers, I just had to try it out for myself. 
 
 
The tutorial can be found here and the cutting template here.  With the exception of the florist foam inside the can, the straw and the adhesive all product on this piece is from Bella Blvd.  To make the flower stem I covered a straw with washi tape, then I attached the crocheted flower to the top.  To make the leaves cut thin strips of green paper and wrap it around a straw, pencil or other round object to create the curls.  Stick a small piece of florist foam in the bottom, secure with a little adhesive to keep it in place and stick the straw in it.  The butterflies are from a Martha Stewart punch.
 
This is a fun little project that really doesn't take too much time and makes a cute little décor item. 
 
Thanks for looking ~ Michelle

Friday, June 14, 2013

Le Tour Eiffel Acrylic Layout

Have you ever worked with Acrylic?  I love all the fun things you can do with acrylic.  I've made a few mini albums with acrylic pages but never any layouts.  Not until I took a class at the Creating Keepsakes Convention in March.  I took one class making layouts with the base being a piece of acrylic.  Love it!!  Here's my first layout made with an acrylic background.
 

Acrylic is a little tricky to photograph, but I managed to get a decent shot.  The picture of the Eiffel tower is from my honeymoon trip.  The patterned paper is from Bo Bunny's C'est La Vie line.  I painted the edge of the acrylic piece with acrylic paint and then painted the tips of the white roses with the same paint to bring more of the color onto the layout.  The flowers and flourishes are from Prima Marketing Inc., and the alphabet stickers are Thickers from American Crafts.


Supply list
 
Patterned paper - Bo Bunny's C'est La Vie
Acrylic sheet - Clear Scraps
Flourishes and flowers - Prima
Alpha stickers - American Crafts
Acrylic Paint
Adhesive
Glue dots
Pop up adhesive
 
Thanks for looking - Michelle