Showing posts with label Fussy Cut. Show all posts

Monday, June 24, 2013

Ambrosia Purse Tutorial

I decided that it was time for another tutorial.  This one is my own design, Yay!  The size of the purse was determined by the length of zipper I used.  Yes, this purse has a functioning zipper on it, how cute would this be with a matching card to insert inside and give as a gift to someone special.  So follow along to learn how to make one of these for yourself.
 
 
Let's start with the zipper piece.  I have a nice stash of zippers in my craft room, a variety of new and used, many are vintage, like the one I used here.  The size of your purse will be determined by the length of zipper you use.  The zipper I used was about 7". (Note: If you don't have a zipper you can make this purse without one, if you want to have a closure, cut a small strip of patterned paper or cardstock to attach to the top back and front, on the front use repositional adhesive or Velcro).
 
 
For the size zipper I used, trim 4 strips of cardstock that are 1" x 6".  Score all pieces down the middle of the length at 1/2".
 
 
Use a strong liquid quick dry adhesive, I use Beacon's 3 n 1, and attach a piece of cardstock to both sides of the top of the zipper.  The picture above is how it will look from the bottom side at this point.  Now attach the other two pieces to the bottom side.  Set aside and let dry until it's time to attach it to the purse.
 
 
Trim two piece of cardstock that are 4" x 9".  Mark both pieces on the long side at 1" and 8". 
 
 
Line up the cardstock on your paper trimmer and trim from the 1" mark to the bottom corner.  Now line up the other side with the 8" mark and trim to the bottom corner.  Repeat for the second 4" x 9" piece. 
 
 
You should now have two pieces that look like this. 
 
 
Next trim a piece of cardstock that is 2" x 12".  With the short side horizontal on the score board, score the length at 1/2" and 1 1/2". Turn your cardstock so the long side is horizontal (like the picture above) and score at 1 1/2" and 10 1/2".
 
Once you have your score marks made, use a pencil to mark both the long side at 1 1/4", 1 3/4", 10 1/4" and 10 3/4".  Use micro tip scissors to trim from one mark to where the score lines meet.  Repeat for the other side. 
 
 
Both ends should like the picture above.
 
 
Now lets trim the pieces for the sides of the purse.  Trim 2 pieces that are 2" x 5 1/8".  With the short side horizontal score the length at 1/2", 1" and 1 1/2".  Turn so the long side is horizontal and score at 1".  Mark the both long sides at 3/4" and 1 1/4".  Use your scissors to trim from each mark into where the 1/2" score meets the 1" score and the 1 1/2" score meets the 1" score.  Fold on the center score line, with the piece folded in half, mark at 5" and trim from the corners to the 5" mark in the center. Repeat for second piece.  You should now have two pieces that look like the picture above.


Trim patterned paper for front and back of purse, use your cardstock as a template.  Adhere to cardstock pieces before assembling purse, it's easier to do while everything is still flat.
 
 
Use a strong adhesive, I like scor-tape, and cover all the edges of the 2" x 12" piece and to the edges of the 2" x 5 1/8" pieces.  Start by attaching the front and back pieces to the long strip in the middle of the 12" piece.  Then attach the side flaps to the two side pieces.  Carefully align and press together the sides to the front and back pieces.  (Note: the side flaps outside the score lines on the 12" piece have not been scored.  You can do this before assembling, or just work it slightly with your fingers to bend with the rest of the sides.)
 
 
Here's a view of what the purse should look like now from the top.  Now it's time to add the zipper.
 
 
Place adhesive on the cardstock that the zipper is attached to, a quick dry liquid is good for this part so you have a little wiggle room to align the zipper. 
 
Now that you have your purse formed you can have fun embellishing it.
 
 
I decided after I was embellishing mine, that it needed a handle.  Trim a strip of cardstock 1/4" by 12" and attach to both sides of the purse.  Attach the ribbon across the top first.
 
 
Then add the flowers, flourishes and butterflies.  Here's a close up of the flowers.  I sprayed them all lightly with a silver glimmer mist and attached either a rhinestone or pearl to the center of each one. 
 
 
The flourishes I used were actually left over pieces cut from a larger piece that was used on another project.  All the little dimensional butterflies are fussy cut from patterned paper. 
 
Hope you enjoyed the tutorial and will soon be making one of your own.
 
Supply List
Cardstock
Patterned Paper - Bo Bunny's Ambrosia line used
Paper Trimmer
Scissors
Pencil
Scor-pal or other scoring tool
Adhesive
Embellishments
 
Thanks for looking ~ Michelle

Monday, May 6, 2013

Family Tree Layout

Several years ago I had plans to make a wood purse.  I picked up these mini metal frames from Michael's and added black and white photos of my family to them.  The plan was to decorate the outside of the purse with the frames and some metal plates with sentiments on them.  It's became one of those projects that I never completed.  For many years I've had these picture filled frames just sitting around waiting for me to create something with them. 
 
I came across this paper from Prima Marketing Inc.  The colors and tones were perfect to create a layout using the frames. 
 

I layered the frames attaching some with pop up adhesive. 


The letters for Family Tree were originally grey, so I used a sponge to cover with brown ink to tie it in with the paper and frames.


Supplies used:
Patterned Paper - Prima
Metal frames - Michael's
3D letter stickers - American Crafts
Brown ink - Close To My Heart
Pop up adhesive
Glue dots
Paper trimmer
Scissors
 
Thanks for looking ~ Michelle

Monday, April 8, 2013

Heidi Swapp Memory File Folder - Part 3

Today I'm sharing my final Heidi Swapp memory file folder mini album.  I really enjoyed with this product and trying some new to me techniques along the way.  Now I have the fun of adding photos and journaling.
 

For the front cover, I used the orange mat piece I trimmed off a photo frame that we used on the original memory file from the class.  It offers a nice pop of color on this cover.  Layer a tag and a flower over it.  Then I used the color magic paper and a Chromatix pen from American Crafts in Evergreen 3.  The banner shape piece was left over from our class so it was already cut.  Then I layered with a piece from Heidi Swapp trimmings and applied heat to the trim and the pink flower of the same material.  When you heat it the edges curl up.

 
The first page on the inside is a card made in the card class that I took from Jennifer Evans at Craft Warehouse.  I love taking classes from Jen, she is an amazing talent.  Lots of layers going on the front of this card. 

 
Here's the inside of the card.  There was a little handmade banner that was orignally to be on this piece, but I saved it and used as an accent in s different folder.

 
I love this small file folder and the pop of yellow off of it.  Again the yellow piece is trimmed off the back of a photo frame.  Add a tag and a few embellishments and it's photo ready.  The bracket shape at the top is made from fussy cutting around the excess color on one of the label stickers. 


For the inside of the small file I used one piece of patterned paper, one tag, a couple scraps  and a few embellishments.  I love that you can trim these decorative tags in so many ways to use in so many ways. 

 
On the back of the small file I used the "negative" side of the die cut banner.  Meaning the banner here is the result of using the piece left after removing the die cut banner.  This is a great way to get as much use out of your product as possibl. 

 
Here's the last page, again I used a small file folder and folded in thirds to fit the larger file.  On the front is some fussy cut chevron pattern and heart stickers. 


On the inside I used more tags, and emellishments as well as scraps of paper.  I love how all these turned out and have enjoyed sharing them with you.  Hopefully you have enjoyed them too.  Check back soon for another project.

Thanks for looking ~ Michelle

Tuesday, February 19, 2013

An Accountant's Valentine

I know it's a bit after Valentine's Day but with the chaos of family visiting and my daughter's birthday party this is my first chance to post this.  I wanted to make my husband a special valentine this year and since he is accounting I thought it'd be fun to make a card geared toward his specialty. 


It's a simple card, with a cardstock base and a couple layers of patterned paper from Bo Bunny's Love Letters line.  I used some Thickers to make the calculator keypad and replaced the bottom keys with I love you.  I attached the Thickers to a piece of cardstock first and then attached that to the card base.  Then I fussy cut a heart and attached with pop up adhesive over the 0.


On the inside a I printed a poem on vellum and layered it over some patterned paper.  I attached it to the card base with brads.
 
Thanks for looking ~ Michelle


Monday, February 4, 2013

Altered Journal Sketch Book

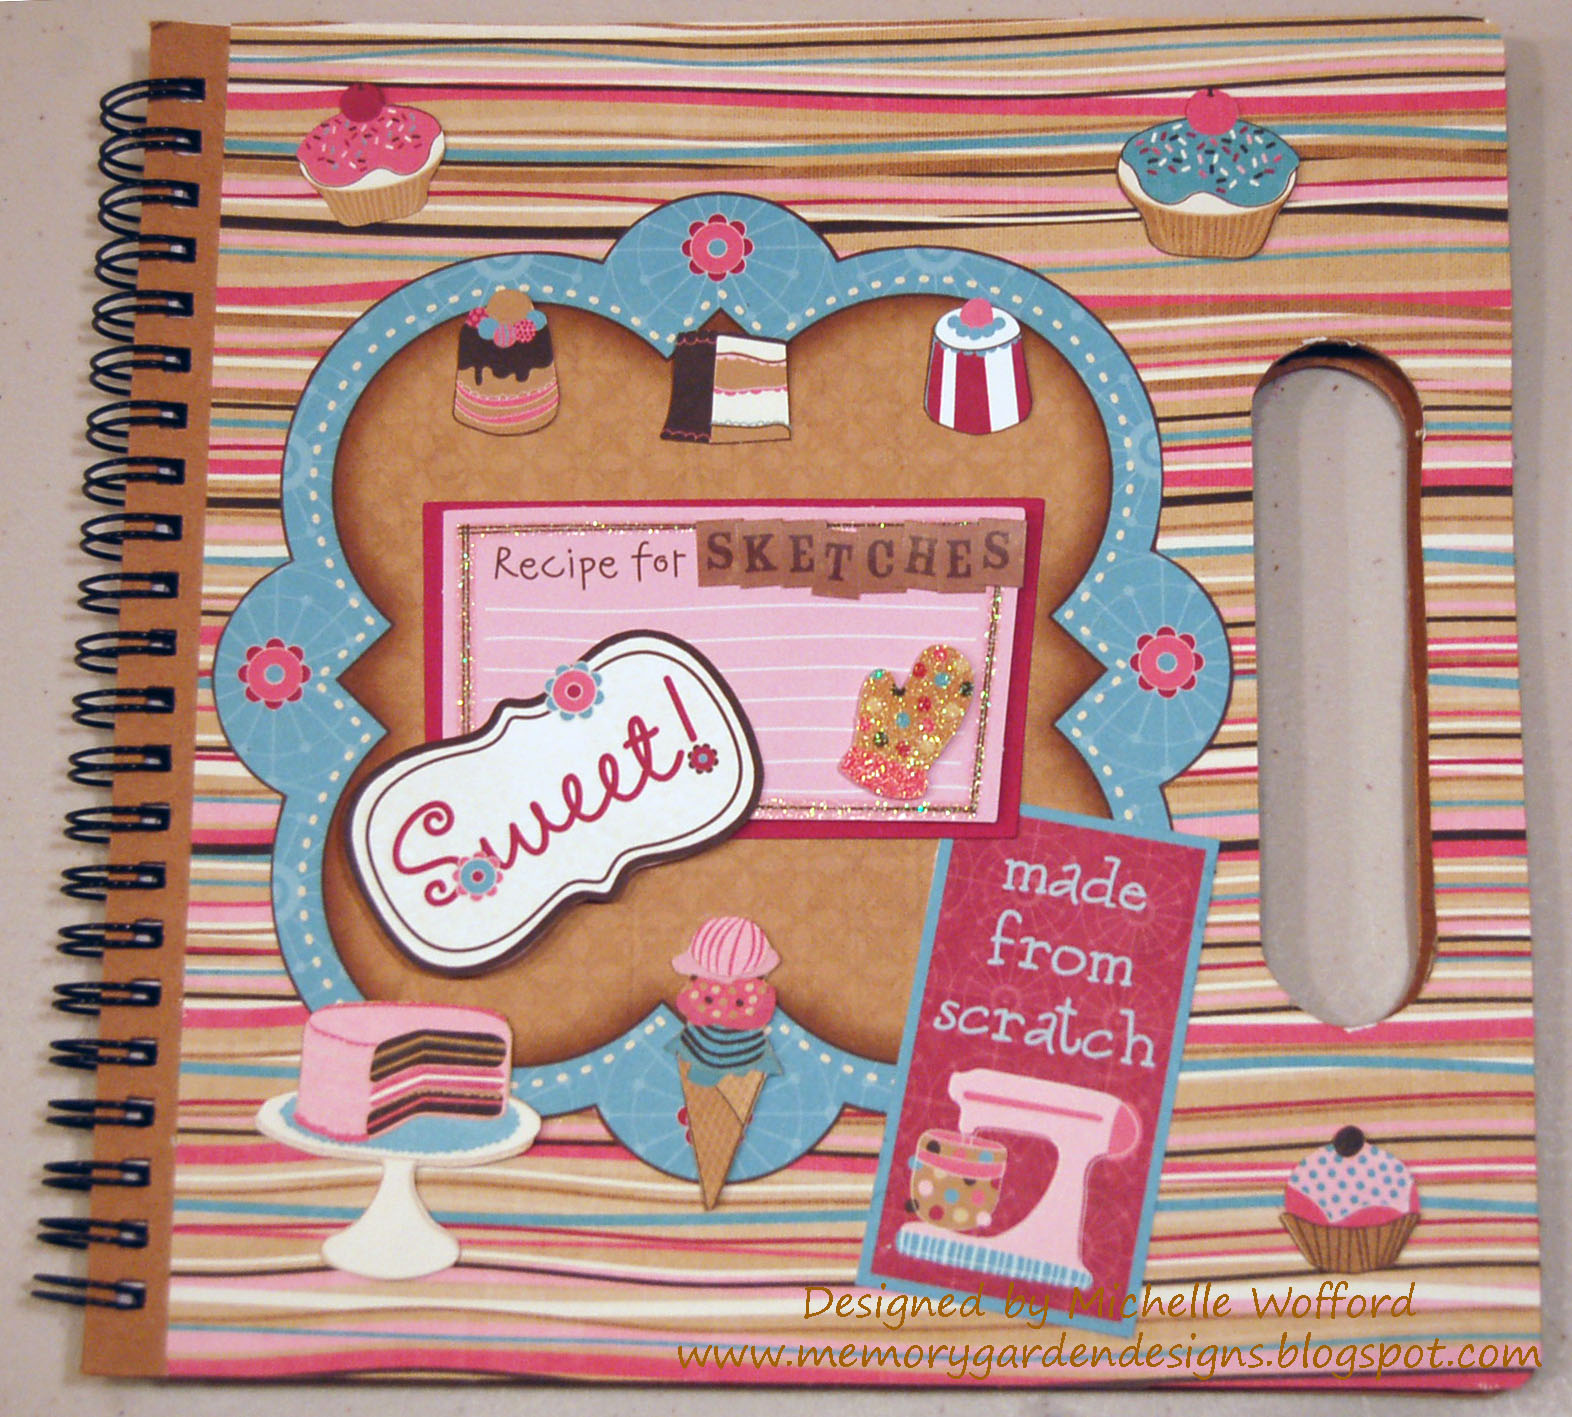
Here is one of my lastest projects, an altered journal.  I used Bo Bunny's, Sweet Tooth line to make this book to keep images / sketches of layouts for inspiration.  If you're like me, you have a stash of magazines sitting on your shelf.  I really don't have the space to save every single magazine so I wanted to take the pieces that I thought I would reference again in the future and have them in one condensed location. This is one of several that I'm making.


I fussy cut the scallop shape in the center, the sweet sentiment and all the cupcakes, cakes, and ice cream.  The Recipe for Sketches is a 3 dimensional sticker from the collection that I altered with alphabet stickers for the word sketches.  Now I just have to add the inspirational pieces inside.

Thanks for looking ~ Michelle

Thursday, January 24, 2013

Love Letter Box

I recently came across a fun new line of paper by Bo Bunny called Love Letters.  Bo Bunny is one of my favorite paper manufacture's so I wasn't surpised, though I dont' really buy "Valentine" like papers, I just had to buy this collection.  I've started working on a few projects using this paper and I wanted to share the first one I completed.  I picked up this little unfinished box at Craft Warehouse a while back and I was waiting for the perfect paper to use with it. 


I love unfinished wood because the potential is endless, however, I'm not a big fan of painting them first.  A great, but messy, alternative is using Tim Holtz distress stains in a color that coordinates with your paper.  Fortunately I had a color that worked on hand and was able to stain the box first and then cover with paper. 


For the sides I cut a 12" long strip slightly smaller than the width of the side.  I then cut them in half and met them in the middle.  I did this with this paper so it wouldn't end up upside down on one side. 


The envelope and "LOVE LETTERS" are stickers, attached with pop up adhesive, and the LOVE forever yours portion is fussy cut from a scrap piece that I was able to salvage a portion of.


The hearts are all fussy cut from one of the sheets of patterned paper and I distressed with a little red ink and adhered them alternating between glue dots and pop up adhesive.


Thanks for looking ~ Michelle

Sunday, September 9, 2012

Gable Gift Box Tutorial

As many of you might know I've written several tutorials for Craft Warehouse as part of their design team, but I've finally written a tutorial to feature here on my own blog.  I've been wanting to do this for a while and finally here it is.  Today I'm going to share with you step by step instructions to make this beautiful Gable Box. 


Supply List
 
Patterned Paper or Cardstock
Scor-Pal or other scoring tool
Bone Folder
Scalloped oval die / punch
Decorative border punch
Corner Rounder
Hole Punch
Paper Trimmer
Scissors
Ribbon
strong quick dry adhesive


First trim a piece of 12" x 12" patterned paper (you want this to be a heavier paper so it can support itself) or cardstock to 8 1/2" x 11".  Here I used Crate Paper's Little Bo Peep line.

 
Next lay the paper lengthwise on your score board (or other scoring tool) and score at 1/2", 3 1/2", 5 3/4" and 8 3/4". 
 
 
Flip your paper so it's vertical with your score board and sore at 3" and 6 1/2".
 
 
Next use a bone folder to pre-fold on the score lines. 
 
 
With your paper lengthwise, cut slits on the score lines from the bottom to the score line perpendicular to it, flip your paper and do the same on the bottom.  Your paper should be solid in the middle and have flaps on the top and bottom, and look like this...


Cut off the top and bottom pieces on the side with the 1/2" flap so just the center on that end is remaining.
 
Now it's time to make the handles.  For this I used a scalloped oval from my Spellbinders Nestabilities dies.  I used the 3rd from the largest oval.
 
 
For this I had to fold my box in half at one of the score lines and line up and run each handle through the die cutter one at a time.  Make sure to fold down all the flaps so that only the piece you want to is cut.  It can be a little tricky but I just eyeballed it and mine came out nicely.  If you have a punch you could use that too.
 
 
Now use your corner rounder to round the corners of the handle.  I did this after I cut my handles but you can do this before to make it a bit easier to handle.
 
 
Okay, now we can assemble the box.  On the inside of the box apply scor-tape to the two non handle top flaps, the two opposite flaps on the bottom, and the outside of the 1/2" flap on the side. 
 

Though the picture shows this step before I rounded the corners the scor-tape can be applied at any point, but I recommend you apply it when you are going to need it. 
 
Starting with the 1/2" side flap in the middle remove the liner from the scor-tape and create the box by joining the small flap to the inside of the other end to form the box.  You may need to fold the flaps out of the way for convenience.
 
Then remove the liner from the two top flaps and fold them in and adhere to the inside walls of the box.
 
 
To create the bottom of the box fold in the two flaps without scor-tape first.
 
 
Then fold remove the liner and fold down one bottom flap with adhesive.
 
 
Then repeat with the other flap.
 
 
Now you have a completed box and you are ready to embellish.
 
 
You could embellish this lovely little box however you'd like but I'm going to quickly show you how to make your own decorative edge fan fold flower.
 
First cut a strip of patterned paper 1 1/2" x 12".  Next punch one of the 12" sides with a decorative border punch, like the Martha Stewart one I used here.  I like this one because it makes it simple to score and fold and looks pretty. 


Next take your score board or scoring tool and on the front side of the paper score at every low point. You may have to move your paper around to line up the points to score.
 
 
Now flip the paper over the so back side is facing up and score at every high point, or the middle point of each scallop, again you might have to move your paper to get it to align properly.
 
 
Now use your bone folder to accordion fold the strip of paper.
 
 
When you are done it should look like this.
 
 
Now I like to take the two ends and meet them together to get the circle shape.  Then apply a small strip of scor-tape to the back side of one edge of the folded piece of paper.
 
 
Remove the liner and attach to the other end to create a circle.
 
 
Next cut a small square or circle of scratch paper and apply a generous amount of a strong, wet, quick dry adhesive to the scratch paper and fold the pleated circle down so the decorative edge is on the outside of a flat circle.  Hold in place to allow time to set (I like to find something heavy to set on it for a few minutes).
 
Embellish the center with a brad, button or a decorative fussy cut flower like I did.  When it's all dry attach the fan fold flower to the box.
 
Use a hole punch to punch two holes in the top of each handle and close with a length of decorative ribbon.


Thanks for looking ~ Michelle ~