Showing posts with label cards. Show all posts

Wednesday, March 23, 2016

Easter Cards

Happy Spring!  Today I wanted to share with you some Easter cards I made.  


For these card I needed a custom size, so I made the card bases from card stock that was trimmed to size.  To make a custom size card base, determine the desired width and length of the card.  Trim card stock to the longest length, then double the width and trim for the width.  For these cards I started with a piece trimmed to 7 1/2" x 11" for a finished card size of 7 1/2" x 5 1/2".


I embellished each card a little differently.  Ribbons were attached with brads and strong adhesive.  Some pieces were "scraps" from other projects, like the blue rhinestone swirls on the flower card.  These "scraps are perfect for little embellishments on cards.


Hope you have a wonderful Easter!

Thanks for looking!


Monday, June 9, 2014

Father's Day Cards!

Happy June everyone, can't believe this year is already almost half way over. And soon Father's Day will be here so I wanted to share with you a few cards I made using some fun laser cut tools to make some awesome and unique Father's Day Cards.


All these cards feature the mini laser cut wood tool set from Unique Laser Designs.  Aren't they fun!


On this card I used metal brads that look like screws, I've had them forever and finally had the perfect project to use them on.


I cut the tool belt from a piece of canvas and distressed it with some Tim Holtz distress ink.   I just winged it when I cut it, I didn't measure anything on this one.


And finally here's a close up of the tool box, this one is my favorite.  I searched for a pattern to make a tool box shaped card so I had to create my own from scratch.  I think it turned out pretty well.


A peak at the inside shows a little shelf I made for the inside that holds all the little tools.


Thanks for looking and Happy Father's Day!

Wednesday, December 18, 2013

Christmas Card Inspiration

Today I want to share with you some Christmas card inspiration for any of those last minute card makers out there.  I was featured as a guest designer for Craft Warehouse recently and these cards were featured on the Craft Warehouse blog
 
 
All the cards feature product from Lawn Fawn.  This Merry and Bright card is the simplest and all the details can be found here.
 
 
The sheet of tags are perfect for gift card holders.  Step by step instructions for this card can be found here.
 
 
This is one of my favorite cards.  Made using a coordinating stamp and die set from Lawn Fawn, I love that you can have a the look of fussy cutting without actually having to fussy cut the image.  You can get all the details for this fun sequenced card here.
 
 
And last but not least, the Merry Christmas mantel card.  There are so many great stamps and dies in one set the creative possibilities are endless.  Check out the steps to create the brick pattern and the mantel here.


Thanks for looking!

Friday, September 20, 2013

Acrylic Strawberry Thank You Card

Have I mentioned I love playing with acrylic?  It adds a unique aspect to paper crafts, and you can do so much with it.  Here is a simple card with a splash of color using an acrylic card base from Close To My Heart. 


I trimmed the strawberry paper a bit smaller than the actual card base and used my We R Memory Keepers corner chomper to round the edges to match the acrylic base.  The banner pieces were made from scraps of paper and I just winged it on those.  The word thanks is made using paper from Jillibean Soup's Coconut Lime Soup 6 x 6 pad. The round punch tool from Epiphany Crafts.  The letters and flower are on the outside of the card.


Thanks for looking!
 

Thursday, June 20, 2013

Guest Designer on the Craft Warehouse Blog

I'm excited to be featured as a Guest Designer for Craft Warehouse today on their blog.  Check out the two 4th of July cards I made with step by step instructions.


Go to the Craft Warehouse blog for all the details on how to make these cards.
 
Thanks for looking ~ Michelle

Saturday, April 20, 2013

Quilt Mother's Day Card

Good morning!  I wanted to share an idea for a Mother's day card before I head off for day 2 of a 3 day murder mystery crop I'm attending.  The paper I used for this card is from My Mind's Eye's, Lost and Found collection.  I love the pretty feminine colors of this paper and the bits of sparkle it has.


To make the card, make your base from cardstock.  Next trim all those little squares, I used a paper trimmer, and they can be any size, depending on how many squares you want and the size card.  This would be a great project for a square punch if you owned one.  I trimmed a piece of cardstock for the base of the quilt so it would be slightly larger than the quilt and adhered all the squares to the base.  Then I used a piece of plastic canvas to create a pattern and mark the zig zag pattern.  It's all handstitched with embroidery floss.  Then trim a couple larger squares, one slightly smaller than the other, layer and attach to card with pop up adhesive.
 
That's it.  Have a wonderful weekend and thanks for looking ~ Michelle

Monday, April 8, 2013

Heidi Swapp Memory File Folder - Part 3

Today I'm sharing my final Heidi Swapp memory file folder mini album.  I really enjoyed with this product and trying some new to me techniques along the way.  Now I have the fun of adding photos and journaling.
 

For the front cover, I used the orange mat piece I trimmed off a photo frame that we used on the original memory file from the class.  It offers a nice pop of color on this cover.  Layer a tag and a flower over it.  Then I used the color magic paper and a Chromatix pen from American Crafts in Evergreen 3.  The banner shape piece was left over from our class so it was already cut.  Then I layered with a piece from Heidi Swapp trimmings and applied heat to the trim and the pink flower of the same material.  When you heat it the edges curl up.

 
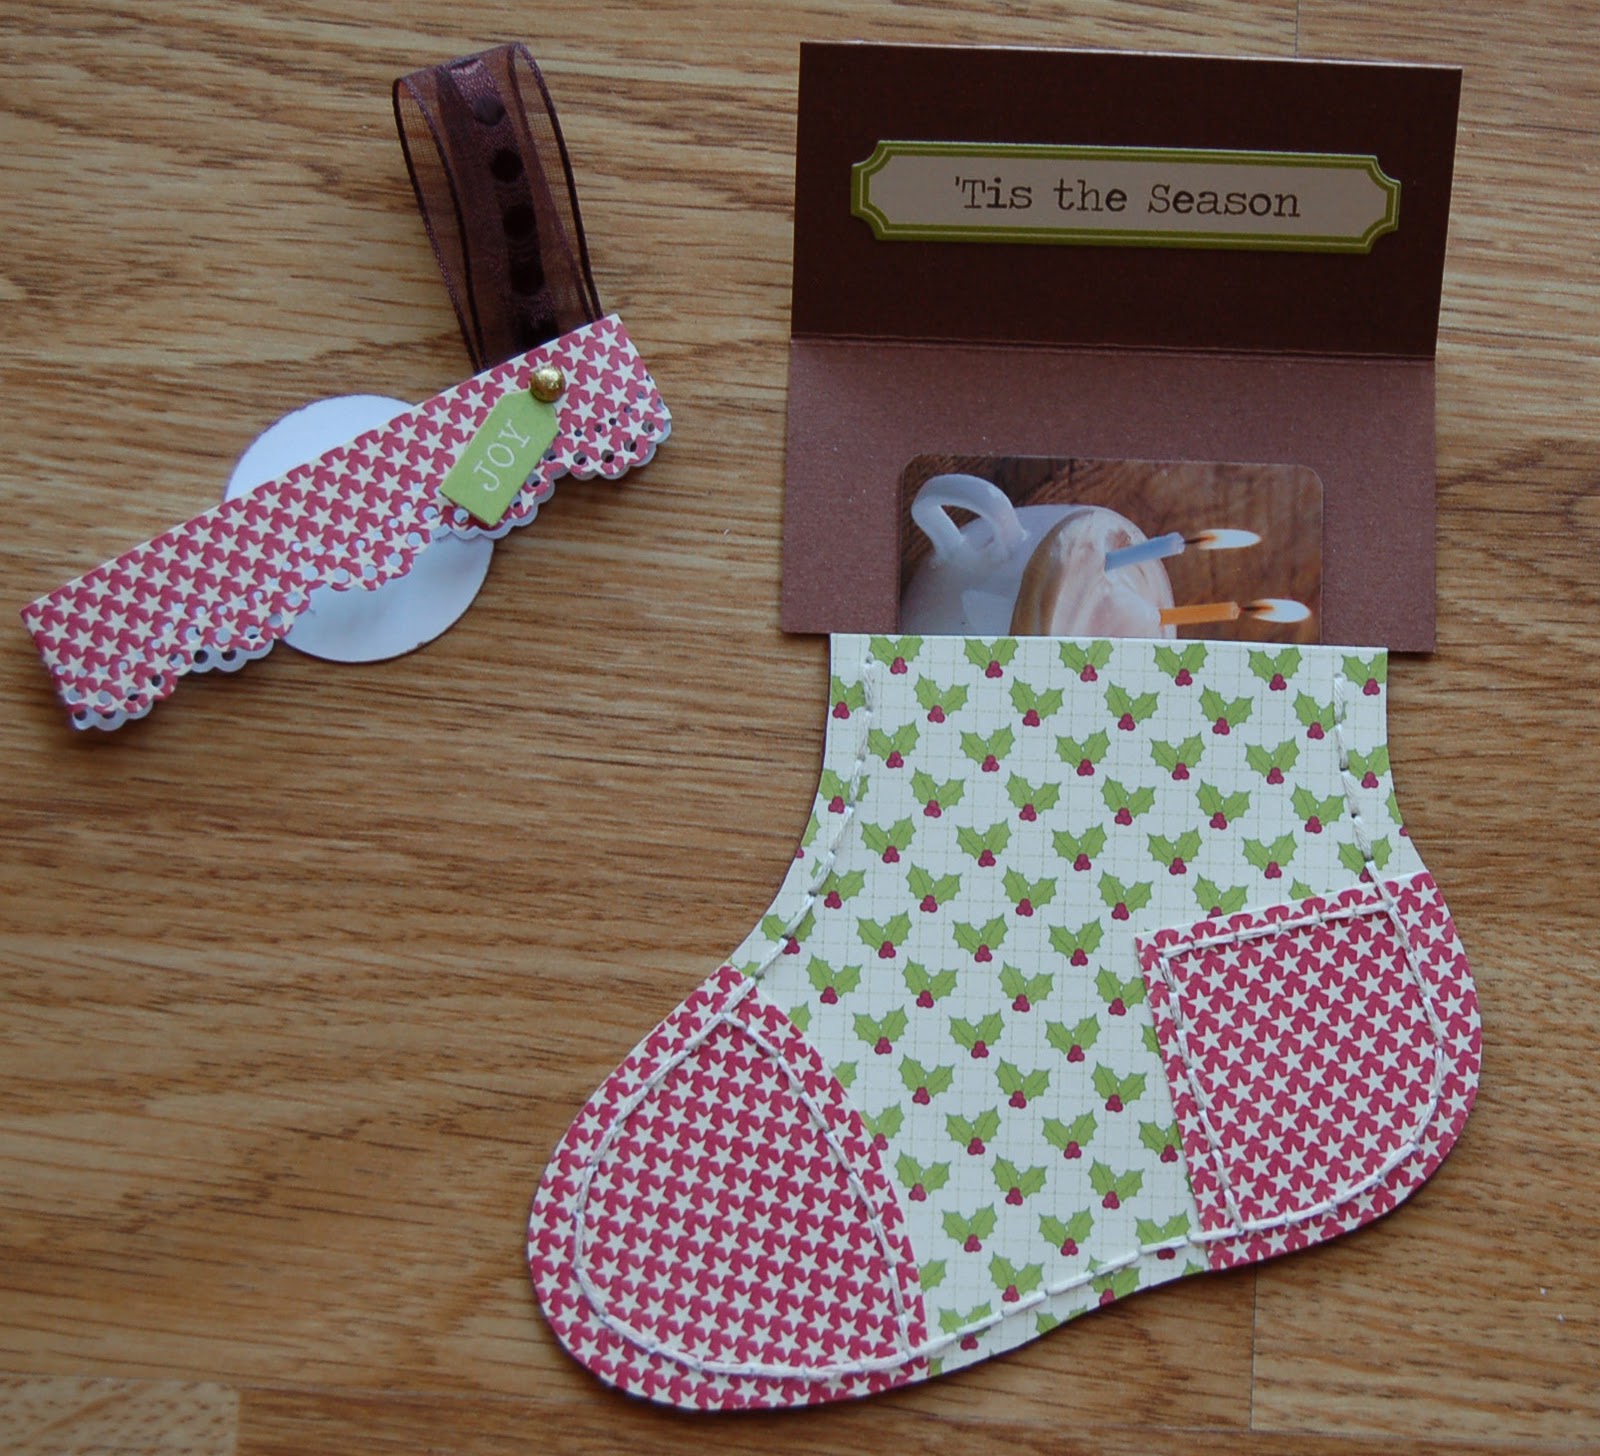
The first page on the inside is a card made in the card class that I took from Jennifer Evans at Craft Warehouse.  I love taking classes from Jen, she is an amazing talent.  Lots of layers going on the front of this card. 

 
Here's the inside of the card.  There was a little handmade banner that was orignally to be on this piece, but I saved it and used as an accent in s different folder.

 
I love this small file folder and the pop of yellow off of it.  Again the yellow piece is trimmed off the back of a photo frame.  Add a tag and a few embellishments and it's photo ready.  The bracket shape at the top is made from fussy cutting around the excess color on one of the label stickers


For the inside of the small file I used one piece of patterned paper, one tag, a couple scraps  and a few embellishments.  I love that you can trim these decorative tags in so many ways to use in so many ways. 

 
On the back of the small file I used the "negative" side of the die cut banner.  Meaning the banner here is the result of using the piece left after removing the die cut banner.  This is a great way to get as much use out of your product as possibl. 

 
Here's the last page, again I used a small file folder and folded in thirds to fit the larger file.  On the front is some fussy cut chevron pattern and heart stickers. 


On the inside I used more tags, and emellishments as well as scraps of paper.  I love how all these turned out and have enjoyed sharing them with you.  Hopefully you have enjoyed them too.  Check back soon for another project.

Thanks for looking ~ Michelle

Wednesday, September 12, 2012

Hey Sunshine Card

I wanted to share another card I made with my Bella Blvd goodies.  This one uses paper from their Sunshine & Happiness line and alphabet stickers from their Birthday Girl line.  I love both these lines and they work well together. 


I love the pop of the pink and green colors.  The sun is fussy cut from a sheet of patterned paper and adhered with pop up adhesive.  Aside from the base, with a few cuts of paper and adhesive this card is simple and quick to put together.  To make the base trim a piece of cardstock to 4 1/4" x 8 1/2" and score it at the 5 1/2" mark.  Then trim a second piece of cardstock to 3" x 8" and score at 4".  Once you adhere the patterned paper to your cardstock bases attach the smaller base to the larger base in the center.  It too is simple to make.

Supplies list
Cardstock: American Crafts, Patterned Paper:  Bella Blvd, Alphabet Stickers: Bella Blvd, Ink: Close to My Heart, paper trimmer and scoring tool

Thanks for looking ~ Michelle ~

Thursday, September 6, 2012

Bella Blvd Birthday Card

Well I haven't posted anything this past week as I was busy working on my submission pieces for the Bella Blvd design team call.  My go to store for scrapbook paper didn't carry any Bella Blvd so I had to order online and by the time it arrived I had a little more than a week to create my entry pieces.  I did create a few extra projects, so I had more options and I wanted to share one with you here today.


I created this recessed window card specifically to use the WISHES banner on, I just thought it would work well together.  The rest just fell into place.  I love the font of the alphabet stickers, and wanted to make sure to use them.  The green square is attached with pop dots as is the happy birthday sticker.  The scalloped edge is a border sticker that I cut into three pieces.  On the four corners  used my epiphany crafts punch to punch out the center of 4 flowers from one of the patterned paper pieces.  The epiphany crafts punch, punches and adhere's the paper to an epoxy shape.

Supply list -

Cardstock - American Crafts

Patterned paper -Bella Blvd - Birthday Girl

Stickers - Bella Blvd - Birthday Girl

Punch / epoxy shape - Epiphany Crafts

Adhesive - ATG tape gun, pop dots and glue dots

Paper Trimmer

Scoring tool

scissors


Thanks for looking ~ Michelle ~

Saturday, August 11, 2012

Blissful Day Card

Today I wanted to share a card that I made awhile back using Authentique's Carefree line.  I fussy cut the butterfies and flower from the patterned paper.  I used staples on the butterflies bodies.  To create the paper coils, cut thin strips of paper and wrap around something thin and round. 


Thanks for looking ~ Michelle ~

Monday, September 26, 2011

Craft Warehouse DT Assignment 2 part 2

For this part of the assignment we were asked to create a set of 4 cards using the Christmas Eve Chowder line from Jillibean Soup.  I really enjoyed working with this line and might have to go get more. 

First is a gift card holder ~


For this card I used a template to cut all the pieces.  I used We R Memory Keepers Sew Easy tool for the stitching around the stocking and hand punched the stitches on the insides of the patches.  The Martha Stewart doily lace punch was used on the band for the closer.

Photo Card ~


Check out split coast stampers for the template to make this recessed window card.  I enjoyed making this card, probably becaused I love this photo of my daughter.  It works well with this paper line.

Tri - Shutter - Elaborate card ~


This template can also be found at splitcoaststampers.com under tri-shutter card.  I love making these cards and the flowers add a nice touch.

And finally my Simple card -

I really wanted to use the penguin paper and was happy to fit it onto this simple card.  I added a sparkley brad to the top of the penguins hat and other than that it's just paper, die cut stars and a sticker.

Thanks for looking ~ Michelle ~

Thursday, September 22, 2011

Craft Warehouse DT Assignment 2 part 1

Wow, it's been a long time since I've posted anything.  The last couple months have been busy and somewhat full of computer problems.  But, I'm able to edit photos again and hopefully will get back to posting regular posts.  So without further ado here are the first two pieces from my second assignment for the Craft Warehouse design team. 

For this assignment we needed to create a layout and a card / tag using the Apple Cheddar line from Jillibean Soup.  Though this is something that I probably would not normally buy, I love this line and enjoyed creating with it.  The biggest challenge...we were only given a 6x6 pad of the line so we had no 12 x 12 pieces to incorporate into the layout.  Here's what I came up with...

Sweet 2 The Core Layout -

To create the flower I cut two 1 1/2" x 6" strips and two 1" x 6" strips and punched the all on one side using the Martha Stewart doily lace punch found at Craft Warehouse.  Once all pieces are punched I scored at every peak and valley and folded at each score. I then attached the two 1 1/2" strips together and the two 1" strips together to create one long strip. Connect the two ends of each piece to create a circle. Then I attached the larger piece to a scrap piece of paper and adhered the smaller piece on top.

Here's my card -

For the card I stamped the image from Pebbles Inc, on several sheets of patterned paper from the collection and hand cut each one out.  I layered them so a bit of each were showing and placed the hand cut basket on top.  

Thanks for looking ~ Michelle ~ 

Wednesday, June 22, 2011

Father's Day Card

I was hoping to have this posted sooner but oh well.  Here is the card I made for my hubby for Father's Day.


I used paper from the DCWV Cotten Blend stack.

Saturday, May 21, 2011

Scrapbooking Blog Party: Card Exchange

Okay, here are a couple cards that I'd like to share in the card exchange.

This first card I made last year for my Craft Warehouse Design Team Submission.  I have not brought myself to give it away, it's one of my favorites. This is a tri-fold shutter card using Bo Bunny paper (forgive me I don't remember the name).  The flowers are handmade rolled flowers with a touch of glimmer mist and I used the metal leaf embellishments from Tim Holtz. I also hand stitched the cross stitch designs on the top and bottom center. 


I made this card for my mom for Mother's Day.  I love how it turned out after I finally got the stitches straight.  The papers are from My Mind's Eye Lost and Found collection.  I trimmed all the squares 1" x 1" and hand stitched the stitching.